Disclaimer
⬥ IF YOU CANNOT GET A METHOD TO WORK DO NOT MESSAGE THE CREATOR(S)
• It is more than likely user error or cutting corners, use PvM help (external Discord) if you cannot get it to work
Positioning
 ⬥ Enter instance and stand on the west tile against the Soul Obelisk.
⬥ Use  to start the encounter.
Specifically for  :
⬥ Use and 
• If Magister spawns adjacent to you, take 1 step north.
⬥ After the kill use again. Repeat (See video for example).
Note: the 3x3 area on the map shows the possible spawn tiles for the Magister.
Magic Low Effort Method (75+ KPH) 
Overview
⬥ The following are highly recommended for increased profits:
•  or another source of tier 4 luck increases
 drop rate from 1/18 to 1/17.
• Vital spark enhancers  double the drop.
⬥  for higher max lifepoints. Stacks with bonfire boost.
⬥ pouches breakdown:
•  Runes -


•  Runes -


•  Runes -


(Runes for 
 )
Note: if you need to downgrade gear, using Animate Dead with T70+ tank boots/helm is an option.
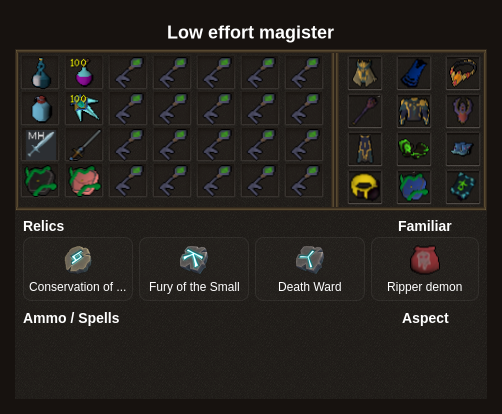
Presets and Relics
Action Bar

Example Kills
Necromancy Low Effort Method (88+ KPH)
Overview

 ⬥ Tiers 3-4
•
 •

 ⬥ Tier 3-6
• All upgrades of


 ⬥ Tier 7
•
 Customised to conjure all spirits
 • Use before hour starts.
⬥ Kwuarm incense sticks
 • Use before hour starts.
⬥ Blood Reaver
 (no scrolls, pre-summoned)
⬥ Cinderbane gloves
 ⬥ Weapon poison +++
 ⬥ Igneous Kal-Mor
 ⬥
 for extra safety using the T90 preset.
⬥ Scripture of Ful
 or Scripture of Wen

⬥ The following are highly recommended for increased profits:
• Increases drop rate from 1/18 to 1/17.
• Vital spark enhancers double the drop.
⬥ Boosting your maximum lifepoints (bonfire  and thermal pool ) is recommended.
• Totem of Vitality  is recommended over bonfire.
⬥ Double Escape  is used to prevent
 bouncing to the obelisk as follows:
• to obelisk → Activate with → back + throw  .
Note: the first few kills will be slower due to Corruption still stacking up.
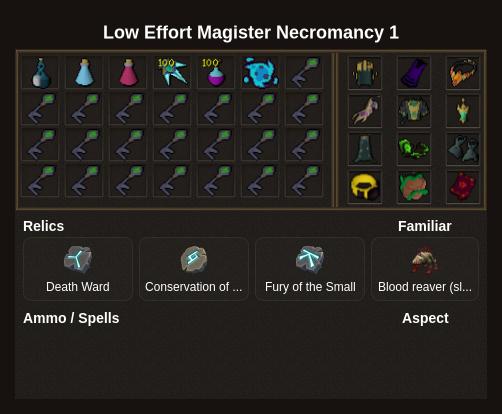
Presets and Relics
Action Bar

Example Kills
Source & licence
By PvME contributors under CC BY-NC-SA 4.0. Navigation and typography adapted. Unavailable source links and contributor names are labelled. Embedded media has separate rights.
Copied on 10 Nov 2026. Not rechecked against the current game.
Download wikitext ↓